Loading... ## 使用介绍: **1.我们首先导入下面的配置信息** **2.修改yml中的配置信息为自己的邮件信息** **3.修改mailServiceImpl中的发送人和接受人邮箱** **4.我们在controller中发起请求就可以发送邮箱了** ## demo结构图: 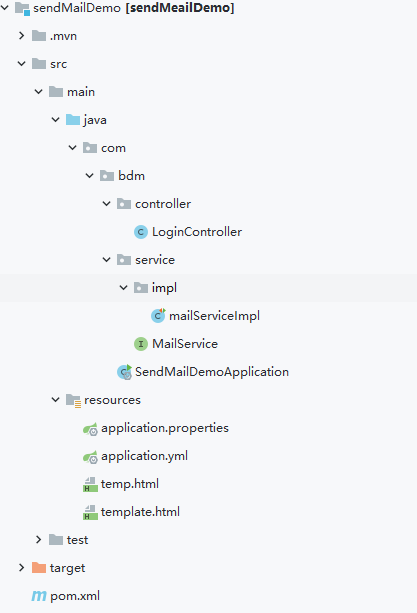 ### 效果图: 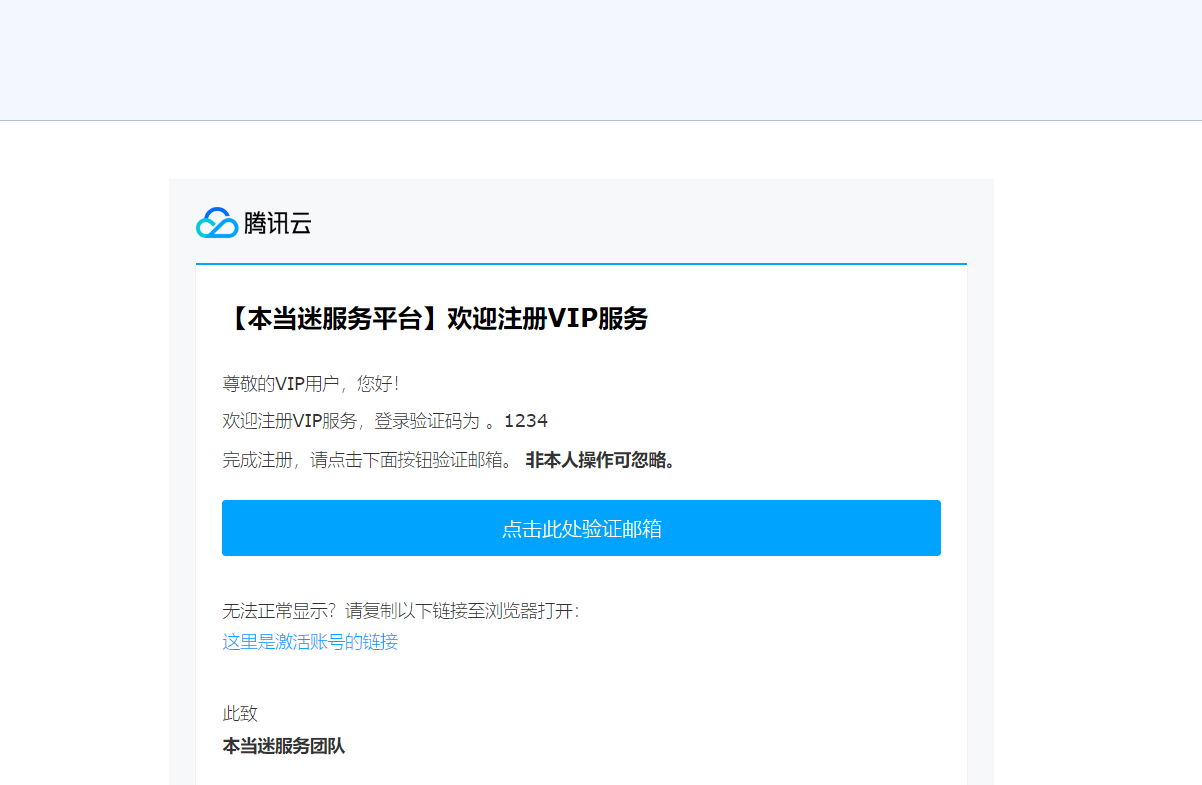 ## 配置准备: ### 依赖pom.xml ```java <dependencies> <!--thymeleaf--> <dependency> <groupId>org.springframework.boot</groupId> <artifactId>spring-boot-starter-thymeleaf</artifactId> </dependency> <dependency> <groupId>ognl</groupId> <artifactId>ognl</artifactId> <version>3.1.26</version> </dependency> <!-- 邮箱验证--> <dependency> <groupId>org.springframework.boot</groupId> <artifactId>spring-boot-starter-mail</artifactId> </dependency> <dependency> <groupId>org.springframework.boot</groupId> <artifactId>spring-boot-starter-web</artifactId> </dependency> </dependencies> ``` ### application.properties: ```java # 应用名称 spring.application.name=thymeleaf_01_helloword # THYMELEAF (ThymeleafAutoConfiguration) # 开启模板缓存(默认值: true ) spring.thymeleaf.cache=false # 检查模板是否存在,然后再呈现 spring.thymeleaf.check-template=true # 检查模板位置是否正确(默认值 :true ) spring.thymeleaf.check-template-location=true #Content-Type 的值(默认值: text/html ) spring.thymeleaf.content-type=text/html # 开启 MVC Thymeleaf 视图解析(默认值: true ) spring.thymeleaf.enabled=true # 模板编码 spring.thymeleaf.encoding=UTF-8 # 要被排除在解析之外的视图名称列表,⽤逗号分隔 spring.thymeleaf.excluded-view-names= # 要运⽤于模板之上的模板模式。另⻅ StandardTemplate-ModeHandlers( 默认值: HTML5) spring.thymeleaf.mode=HTML5 # 在构建 URL 时添加到视图名称前的前缀(默认值: classpath:/templates/ ) spring.thymeleaf.prefix=classpath:/templates/ # 在构建 URL 时添加到视图名称后的后缀(默认值: .html ) spring.thymeleaf.suffix=.html ``` ### application.yml ```java server: port: 8080 spring: mail: # SMTP服务器 host: smtp.qq.com # 发送验证码邮箱 username: 1302509589@qq.com # 授权码 password: xxhciyihgkmxxxx # 编码 default-encoding: utf-8 port: 587 # 配置SSL 加密工厂 properties: mail: smtp: socketFactoryClass: javax.net.ssl.SSLSocketFactory #表示开启 DEBUG 模式,这样,邮件发送过程的日志会在控制台打印出来,方便排查错误 debug: true ``` ### 腾讯云模板:(html) template.html ```java <!DOCTYPE html> <html lang="en" xmlns:th="http://www.thymeleaf.org"> <head> <meta charset="UTF-8"> <title>Title</title> </head> <body> <div> <includetail> <div align="center"> <div class="open_email" style="margin-left: 8px; margin-top: 8px; margin-bottom: 8px; margin-right: 8px;"> <div> <br> <span class="genEmailContent"> <div id="cTMail-Wrap" style="word-break: break-all;box-sizing:border-box;text-align:center;min-width:320px; max-width:660px; border:1px solid #f6f6f6; background-color:#f7f8fa; margin:auto; padding:20px 0 30px; font-family:'helvetica neue',PingFangSC-Light,arial,'hiragino sans gb','microsoft yahei ui','microsoft yahei',simsun,sans-serif"> <div class="main-content" style=""> <table style="width:100%;font-weight:300;margin-bottom:10px;border-collapse:collapse"> <tbody> <tr style="font-weight:300"> <td style="width:3%;max-width:30px;"></td> <td style="max-width:600px;"> <!-- LOGO --> <div id="cTMail-logo" style="width:92px; height:25px;"> <!--替换跳转链接 --> <a href=""> <!--替换LOGO图片--> <img border="0" src="https://imgcache.qq.com/open_proj/proj_qcloud_v2/mc_2014/cdn/css/img/mail/logo-pc.png" style="width:92px; height:25px;display:block"> </a> </div> <!--页面上边的蓝色分割线--> <p style="height:2px;background-color: #00a4ff;border: 0;font-size:0;padding:0;width:100%;margin-top:20px;"></p> <div id="cTMail-inner" style="background-color:#fff; padding:23px 0 20px;box-shadow: 0px 1px 1px 0px rgba(122, 55, 55, 0.2);text-align:left;"> <table style="width:100%;font-weight:300;margin-bottom:10px;border-collapse:collapse;text-align:left;"> <tbody> <!-- 第一个单元格--> <tr style="font-weight:300"> <!--左侧表格,设置左边距用的--> <td style="width:3.2%;max-width:30px;"></td> <!--中间表格,正文使用--> <td style="max-width:480px;text-align:left;"> <!-- 以下是正文 可以是标题--> <h1 id="cTMail-title" style="font-size: 20px; line-height: 36px; margin: 0px 0px 22px;"> 【本当迷服务平台】欢迎注册VIP服务 </h1> <p id="cTMail-userName" style="font-size:14px;color:#333; line-height:24px; margin:0;"> 尊敬的VIP用户,您好! </p> <p class="cTMail-content" style="line-height: 24px; margin: 6px 0px 0px; overflow-wrap: break-word; word-break: break-all;"> <span style="color: rgb(51, 51, 51); font-size: 14px;"> 欢迎注册VIP服务,登录验证码为 。<span th:text="${code}"></span> </span> </p> <p class="cTMail-content" style="line-height: 24px; margin: 6px 0px 0px; overflow-wrap: break-word; word-break: break-all;"> <span style="color: rgb(51, 51, 51); font-size: 14px;">完成注册,请点击下面按钮验证邮箱。 <span style="font-weight: bold;">非本人操作可忽略。</span> </span> </p> <!--按钮--> <p class="cTMail-content" style="font-size: 14px; color: rgb(51, 51, 51); line-height: 24px; margin: 6px 0px 0px; word-wrap: break-word; word-break: break-all;"> <!--下面替换成自己的链接 --> <a id="cTMail-btn" href="https://www.bdmcom.cn" title="本当迷博客" style="font-size: 16px; line-height: 45px; display: block; background-color: rgb(0, 164, 255); color: rgb(255, 255, 255); text-align: center; text-decoration: none; margin-top: 20px; border-radius: 3px;"> 点击此处验证邮箱 </a> </p> <p class="cTMail-content" style="line-height: 24px; margin: 6px 0px 0px; overflow-wrap: break-word; word-break: break-all;"> <span style="color: rgb(51, 51, 51); font-size: 14px;"> <br> 无法正常显示?请复制以下链接至浏览器打开: <br> <a href="" title="" style="color: rgb(0, 164, 255); text-decoration: none; word-break: break-all; overflow-wrap: normal; font-size: 14px;"> 这里是激活账号的链接 </a> </span> </p> <!--来个署名--> <dl style="font-size: 14px; color: rgb(51, 51, 51); line-height: 18px;"> <dd style="margin: 0px 0px 6px; padding: 0px; font-size: 12px; line-height: 22px;"> <p id="cTMail-sender" style="font-size: 14px; line-height: 26px; word-wrap: break-word; word-break: break-all; margin-top: 32px;"> 此致 <br> <strong>本当迷服务团队</strong> </p> </dd> </dl> </td> <!--右侧表格,设置右边距用的 --> <td style="width:3.2%;max-width:30px;"></td> </tr> </tbody> </table> </div> <!--页面底部的推广 --> <div id="cTMail-copy" style="text-align:center; font-size:12px; line-height:18px; color:#999"> <table style="width:100%;font-weight:300;margin-bottom:10px;border-collapse:collapse"> <tbody> <tr style="font-weight:300"> <!-- 左,左边距--> <td style="width:3.2%;max-width:30px;"></td> <!--中,正文 --> <td style="max-width:540px;"> <p style="text-align:center; margin:20px auto 14px auto;font-size:12px;color:#999;"> 此为系统邮件,请勿回复。 可以加个链接 <a href="" style="text-decoration:none;word-break:break-all;word-wrap:normal; color: #333;" target="_blank"> 取消订阅 </a> </p> 可以加个图片,公众号二维码之类的 <p id="cTMail-rights" style="max-width: 100%; margin:auto;font-size:12px;color:#999;text-align:center;line-height:22px;"> <img border="0" src="http://imgcache.qq.com/open_proj/proj_qcloud_v2/tools/edm/css/img/wechat-qrcode-2x.jpg" style="width:64px; height:64px; margin:0 auto;"> <br> 关注服务号,移动管理云资源 <br> <img src="https://imgcache.qq.com/open_proj/proj_qcloud_v2/gateway/mail/cr.svg" style="margin-top: 10px;"> </p> </td> <!--右,右边距 --> <td style="width:3.2%;max-width:30px;"></td> </tr> </tbody> </table> </div> </td> <td style="width:3%;max-width:30px;"></td> </tr> </tbody> </table> </div> </div> </span> <br> </div> </div> </div> </includetail> </div> </body> </html> ``` ## java程序: ### controller **LoginController** 请求地址::http://localhost:8080/login ```java package com.bdm.controller; import com.bdm.service.MailService; import org.springframework.beans.factory.annotation.Autowired; import org.springframework.mail.javamail.JavaMailSender; import org.springframework.stereotype.Service; import org.springframework.web.bind.annotation.GetMapping; import org.springframework.web.bind.annotation.RequestMapping; import org.springframework.web.bind.annotation.RestController; import java.util.HashMap; import java.util.Map; /** * @code Description * @code author 本当迷 * @code date 2022/8/21-7:11 */ @RestController @RequestMapping("login") public class LoginController { @Autowired public MailService mailService; @GetMapping public String login(){ mailService.sendMail(); return "发送成功!"; } } ``` ### service: **MailService** ```java /** * @code Description * @code author 本当迷 * @code date 2022/8/21-7:20 */ public interface MailService { void sendMail(); } ``` ### serviceImpl:(核心代码) **mailServiceImpl** ```java package com.bdm.service.impl; import com.bdm.service.MailService; import org.junit.Test; import org.springframework.beans.factory.annotation.Autowired; import org.springframework.mail.javamail.JavaMailSender; import org.springframework.mail.javamail.MimeMessageHelper; import org.springframework.stereotype.Component; import org.thymeleaf.TemplateEngine; import org.thymeleaf.context.Context; import org.thymeleaf.templateresolver.ClassLoaderTemplateResolver; import javax.mail.internet.MimeMessage; /** * @code Description * @code author 本当迷 * @code date 2022/8/21-7:11 */ @Component public class mailServiceImpl implements MailService { @Autowired private JavaMailSender javaMailSender; //发送人 public String from = "1302509589@qq.com"; //接收人 public String to = "1474051104@qq.com"; //标题 public String subject = "测试邮件"; // 验证码 public String code = "1234"; public void sendMail() { // 创建模板引擎 final TemplateEngine engine = new TemplateEngine(); // 读取磁盘中的模板文件 final ClassLoaderTemplateResolver resolver = new ClassLoaderTemplateResolver(); // 设置引擎使用 resolver engine.setTemplateResolver(resolver); // 指定数据 final Context context = new Context(); // 把验证码的变量替换 1234 就可以了 context.setVariable("code", code); // 处理模板 final String html = engine.process("template.html", context); System.out.println(html); try { MimeMessage message = javaMailSender.createMimeMessage(); MimeMessageHelper helper = new MimeMessageHelper(message,true); helper.setFrom(from+"(本当迷)"); helper.setTo(to); helper.setSubject(subject); helper.setText(html,true); javaMailSender.send(message); } catch (Exception e) { e.printStackTrace(); } } @Test public void test01(){ // 创建模板引擎 final TemplateEngine engine = new TemplateEngine(); // 读取磁盘中的模板文件 final ClassLoaderTemplateResolver resolver = new ClassLoaderTemplateResolver(); // 设置引擎使用 resolver engine.setTemplateResolver(resolver); // 指定数据 final Context context = new Context(); context.setVariable("code", "1234"); // 处理模板 final String html = engine.process("template.html", context); System.out.println(html); } } ``` 最后修改:2022 年 08 月 21 日 © 允许规范转载 打赏 赞赏作者 支付宝微信 赞 2 如果文章有用,请随意打赏。